


valutazioni - 4, GPA: 3.5
(


 )
)
|
Foto e specifiche Hyundai H-2204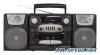 |


Facilità d'uso
Prefer servicing to qualified service personnel. • DANGEROUS VOLTAGE: Uninsulated dangerous voltage that may be of sufficient magnitude to constitute a risk of electrical shock to persons is present within this product enclosure. • ATTENTION: The owner’s manual contains important operating and maintenance instructions. For your safety, it is necessary to refer to the manual. Power supply and connection Battery operation • Remove battery compartment cover. • Put in 6 batteries (UM-1, size “D” or equivalent) in connect polarity as indicated inside the compartment. 2 • Replace the cover. NOTE: Check your batteries regularly, old or discharged batteries should be replaced. If the unit is not going to be used for some time or is being run exclusively on alternative power, remove the batteries to avoid damage. High power batteries only should be used to operate this unit. Ac operation • Take the supplied AC power cord and connect the corresponding end to the AC socket and household mains outlet. Make sure the voltage is compatible. • NOTE: push the AC/DC power selector to AC when operate the unit with AC power. • Push the AC/DC power selector to DC when operate the unit with DC power. Radio operation Operation • Set Function switch to “RADIO” position. • Select the desired radio frequency band with band selector. • Rotate tuning regulator to set the dial pointer against the station frequency as marked on the dial scale. • Adjust volume control to the desired level. To turn off the radio, set the Function switch to TAPE position. Cassette recorder operation • The double cassette recorder has 2 cassette desk: tape “A” and tape “B”. The difference between them is tape “B” has record function but tape ”A” has play function only. • STOP/EJECT BUTTON: during operation, press to stop all desk operation. Press again to open the cassette door. • FORWARD BUTTON /REWIND BUTTON: press to start rapid tape transference in either forward or reverse direction. • PLAY BUTTON: press to start playback. • PAUSE BUTTON: press to stop tape operation temporarily. Press again to resume the tape operation. • RECORD BUTTON (tape “B”): press to start recording. Insertion and removal of cassette • Press stop/eject button to open the cassette door. • Put your cassette tapes down the holder properly with exposed section upward, and the playback side facing you. • Close the cassette door securely before starting. When finished, press stop/eject button to open the holder and retrieve your cassette. NOTE: Before inserting cassette, take up any slack tape by turning the tape spool. If the spool feels tight this could be due to ridges formed in the tape. This can usually be overcome by fast winding the cassette to the end and back again. Use only well known brands of tape and avoid the use of C120's. Do not expose cassettes to direct sunlight, dust or oil. 3 Playback • You can choose either tape “A” or tape “B” for playback. • Set Function switch to TAPE position. • Put in your cassette tape. • Press PLAY button to activate playback. • Adjust volume regulator to the appropriate level as desired. • Press STOP/EJECT button when finished. Continuous playback (only running from “A” to “B”) • Set Function switch to TAPE position. • Put in your cassette tapes. • Press PLAY button of the desk “A”. • Press PAUSE button and PLAY button of the deck “B”. • Adjust volume regulator to the appropriate level as desired. • When tape “A” reaches its end and store, tape “B” starts playing back automatically stop. AUTO STOP • At the end of the tape during the playback and record operations, the forward and rewind operations the auto stop system will function and disengage the mechanism. Recording (deck “B” only) Recording from tape A to tape B • Insert a pre-recorded cassette with full reel on the right into desk “A”. • Insert a blank cassette tape with full reel on the right into desk “B”. • Set Function switch to TAPE position. • Press PAUSE button and RECORD button of the tape “B”. To start recording press PLAY button of the tape “A” and press RAUSE button of the tape “B”. Then both tapes start dubbing synchronously. • Adjust VOLUME regulator for monitoring purpose. • To stop dubbing, press both STOP/EJECT button. Recording with built-in microphone • Insert a blank cassette tape into the desk “B”. • Set Function switch to TAPE position. • Press RECORD button. • Speak in a normal voice at a distance of approximately 30 cm from the built-in microphone. 4 • To stop the recording temporarily press PAUSE button, to resume recording repress PAUSE button. • Press STOP/EJECT button when finished. Maintenance and care • Check your batteries regularly, old or discharged batteries should be replaced. If the unit is not going to be used for some time or is being run exclusively on the alternative power, remove the batteries to avoid leakage and damage. • Electronic products of this kind should never be subje...