


valutazioni - 2, GPA: 5
(
 )
)
)
|
Foto e specifiche Sony CMT-SE1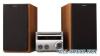 |


Facilità d'uso
1 Prepare the sound source you want to play. • CD: Insert a disc. To start from a specific track, make a program (see “Creating your own program” on page 7). • TUNER: Tune in the preset radio station (see “Listening to the radio” on page 9). 2 Press VOL +/– (or turn VOLUME control on the unit) to adjust the volume. 3 Press CLOCK/TIMER SET. 4 Press . or > repeatedly until “DAILY SET ?” appears, then press ENTER. 5 Set the time to start playing. Press . or > repeatedly to set the hour, then press ENTER. The minute indication flashes. Press . or > repeatedly to set the minute, then press ENTER. 6 Set the time to stop playing following the same procedure as step 5. 7 Press . or > repeatedly until the desired sound source appears. Each time you press the button, the display changes cyclically as follows: TUNER y CD PLAY 8 Press ENTER. The start time, the stop time, the sound source and the volume appear in turn, then the original display returns. 9 Press ?/1 to turn off the system. Other operations To Do this Check the setting 1 Press CLOCK/TIMER SELECT. 2 Press . or > repeatedly until “DAILY ON?” appears, then press ENTER. Change the setting Start over from step 1. Cancel the timer 1 Press CLOCK/TIMER SELECT. 2 Press . or > repeatedly until “DAILY OFF?” appears, then press ENTER. Notes • If you use the Daily Timer and the Sleep Timer at the same time, the Sleep Timer has priority. • If the system is on about 15 seconds before the preset time, the Daily Timer will not be activated. • You cannot use the optional component connected to MD (TAPE) IN jack as the sound source for Daily Timer. 12GB Display Turning off the display — Power Saving Mode The clock display can be turned off to minimize the amount of power consumed during standby (Power Saving Mode). Press DISPLAY repeatedly while the system is off until the clock display disappears. To cancel Power Saving Mode Press DISPLAY while the system is off. Each time you press the button, the display switches cyclically as follows: Clock display* y No display (Power Saving Mode) * The clock is displayed only if you set the clock. Note You cannot perform the following operations in Power Saving Mode. – setting the clock – changing the CD power manage function – switching the MD (TAPE) function Tips • ?/1 indicator lights up even in Power Saving Mode. • The timer continues to operate in Power Saving Mode. Viewing information about the disc in the display You can check the playing time and remaining time of the current track or that of the disc. Checking the remaining time and titles (CD) Press DISPLAY during Normal Play. Each time you press the button, the display changes cyclically as follows: Current track number and elapsed playing time t Current track number and remaining time t Remaining time of the disc*1 t Track title of CD-TEXT disc*2 t Clock display t Bass level t Treble level *1 “– –.– –” appears in Program Play mode. *2 When the disc contains more than 20 tracks, CD-TEXT is not displayed from track 21 on. Checking the total playing time and titles (CD) Press DISPLAY in stop mode. Each time you press the button, the display changes cyclically as follows: Total playing time t Disc title* t Clock display t Bass level t Treble level * For CD-TEXT discs (certain characters cannot be displayed). Note When fast forward or fast reverse is performed, elapsed playing time and remaining time of the track may not be displayed accurately. Display 13GB Optional Components Hooking up optional components To enhance your system, you can connect optional components. Refer to the operating instructions provided with each component. Optional digital component Optional analog component To the digital input jack of an optional digital component A MD (TAPE) IN jack (stereo mini jack) Use audio cord (not supplied) to connect an optional analog component (MD deck or tape deck, etc.) to this jack. You can then listen to the sound from the component. B MD (TAPE) OUT jack (stereo mini jack) Use audio cord (not supplied) to connect an optional analog component (MD deck or tape deck, etc.) to this jack. You can then listen to the sound through this system. From the audio output jack of an optional analog component To the audio input jack of an optional analog component C CD OPTICAL OUT DIGITAL jack Use a digital optical cable (square, not supplied) to connect an amplifier, MD deck, or DAT deck with a digital optical input jack. Digital signal is output only when the system function is set to CD. If the jack is covered with a cap, remove it before use. 14GB Listening to audio from a Recording on a connected connected component component Listening to a connected MD deck 1 Connect the audio cord. See “Hooking up optional components” on page 14. 2 Press MD (TAPE) (or FUNCTION on the unit) repeatedly until “MD” appears. Start playing the connected component. Listening to a connected tape deck 1 Connect the audio cord. See “Hooking up optional components” on page 14. 2 Press MD (TAPE) (or FUN...