


valutazioni - 1, GPA: 5
(
 )
)
)
|
Foto e specifiche Casio PX-800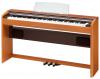 |


da questo dispositivo ha anche altre istruzioni :
Facilità d'uso
E-28 To install the SMF conversion software (SMF Converter) ....................................................... E-28 Using an SD Memory Card ............. E-29 Inserting and Removing an SD Memory Card .......... E-30 Playing Back a File Stored on an SD Memory Card ...................................................... E-30 Transferring Song Data from an SD Memory Card to Digital Piano Memory ............... E-31 Saving Song Data Recorded on the Digital Piano to an SD Memory Card ........................ E-32 Formatting an SD Memory Card ............................... E-33 SD Memory Card Errors............................................ E-34 Reference......................................... E-41 Troubleshooting ........................................................ E-41 Product Specifications............................................... E-43 Operating Precautions .............................................. E-44 Appendix............................................ A-1 Tone List ..................................................................... A-1 Drum Assignment List ................................................. A-2 Song List ..................................................................... A-3 MIDI Implementation Chart E-2 General Guide 8 ck bm bo bq bs bl 9 bn bp br bt cl bk cn cm 1-1 2 3 4 5 6 7 1-2* Front Bottom * The power cord of the PX-800 is hard-wired to the digital piano. General Guide General Guide CAUTION • Make sure that the cover is fully open whenever you are playing on the keyboard. A partially open cover can suddenly close unexpectedly and pinch your fingers. NOTE • The names shown here are always indicated in bold when they appear within the text of this manual. 1-1 Power supply box 1-2 AC power jack 2 Pedal connector 3 MIDI OUT/IN terminals 4 USB port 5 Speaker connector 6 LINE OUT R, L/MONO jacks 7 PHONES jack 8 Display 9 TONE lamp bk SONG lamp bl – (• ........ /NO) button, + (• ........ /YES) button bm TONE/SONG button bn SONG PLAY/STOP button bo TEMPO/SETTING button bp PART/TRACK button L/1 lamp R/2 lamp bq CARD button br RECORDER button PLAY lamp, REC lamp bs GRAND PIANO button bt METRONOME button ck Power lamp cl POWER button cm VOLUME controller cn SD CARD SLOT General Guide General Guide TEMPO/SETTING Button The TEMPO/SETTING button is used when configuring a variety of different digital piano settings. The following are TEMPO/SETTING button basics. • The lamp above the TEMPO/SETTING button flashes while the button is depressed, and goes out when the button is released. Flashing Off • To change a setting, hold down the TEMPO/ SETTING button as you press the keyboard key that is assigned the setting you want to select. – (• ......../NO) Button and + (• ......../YES) Button You can change a displayed setting by pressing the – (• ......../NO) or + (• ......../YES) button as you hold down the TEMPO/SETTING button. • Holding down either button changes the value at high speed. Example: “Selecting and Playing a Tone” on page E-7. NOTE • Pressing the – (• ......../NO) and + (• ......../YES) buttons at the same time will return the displayed value to its default setting. Example: “Selecting a Tone Using the Keyboard Keys” on page E-8. • See the “Keyboard Keys Used for Configuring Settings” on page E-21 for details about the various settings that can be selected using TEMPO/ SETTING button and keyboard key combinations. Power Supply Power Supply Your digital piano runs on standard household power. Be sure to turn off power whenever you are not using the digital piano. 1. Make sure that the POWER button is in the OFF position (raised). POWER button ON OFF Front (Power lamp on) (Power lamp off) Power lamp 2. Connect the power cord that comes with the digital piano to the AC power jack on the bottom of the digital piano.* * PX-800V only 3. Plug the power cord into a household power outlet. IMPORTANT! • Always make sure that the POWER button is the OFF position before plugging in or unplugging the power cord. • The shape of the power cord plug and household power outlet receptacle differ according to country and geographical area. The illustration shows just one example of the shapes that are available. • The power cord of the PX-800 is hard-wired to the digital piano. • Make sure the power lamp is completely turned off before unplugging the power cord from the power outlet. Be sure to read and observe all of the safety precautions concerning power supply. Connections Connections IMPORTANT! IMPORTANT! • Whenever connecting something to the digital piano, first use the VOLUME controller to set the volume to a low level. After connecting, you can adjust the volume to the level you want. Connecting Headphones Bottom Commercially available headphones PHONES jack Stereo standard plug Connect commercially available headphones to the PHONES jack. Connecting headphones to the PHONES jack cuts off output to the speakers, which means you can practice even late at night without both...