


valutazioni - 3, GPA: 3.3
(


 )
)
|
Foto e specifiche Canon XH A1S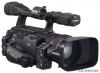 |


da questo dispositivo ha anche altre istruzioni :
Facilità d'uso
Capturing a Still Image from a Tape With the custom function [PHOTO BUTTON] ( 97) you can select to activate the capturing of a still image during playback pause. 1. Activate the capturing of still images with the custom function [PHOTO BUTTON] ( 97). 2. In playback pause, press the PHOTO button to record the frame as a still image on the memory card. Still images cannot be captured from a tape when [SIGNAL SETUP] [LETTERBOX] is set to [ON]. 115 Using a Memory Card Screen Displays during Still Image Recording Metering Mode Icon ( 118) Indicates the metering mode currently selected for recording still images. Drive Mode Icon ( 117) Indicates the drive mode currently selected for recording still images. Image Quality and Size Indicates the quality and size currently selected for recording still images. Remaining Number of Still Images that can be Recorded on the Memory Card flashing in red: No card in green: 6 or more images in yellow: 1 to 5 images in red: No more images • The indication may not decrease even though a recording has been made, or may decrease by 2 images at once. • All indicators are displayed in green when a memory card is played back. “ ” Card Access Display Indicates that the camcorder is writing on the memory card. Reviewing a Still Image Right After Recording You can select to display a still image for 2, 4, 6, 8 or 10 seconds after it has been recorded. MENU CAMERA SETUP REVIEW •••••••2sec ( 27) Open the menu and select [CAMERA SETUP]. Select [REVIEW], select a setting option and close the menu. • Regardless of the [REVIEW] setting, a still image is displayed as long as you hold the PHOTO button after recording. • The still image operations menu appears when you press the SELECT/SET dial while you are reviewing a still image or right after recording one. In this menu, you can protect ( 123) or erase ( 122) the image. • The [REVIEW] setting is only available when the drive mode is set to (single). Drive Mode Drive mode Use Continuous Shooting Captures a quick series of still images while you hold the PHOTO button pressed down. High-Speed Continuous For the number of shots per second, refer to the table below. AEB The camcorder records a still image in three different exposures (dark, normal, light in (Auto Exposure Bracketing) 1/2 EV steps). Single Records a single still image when you press the PHOTO button. Changing the Drive Mode 1. Set the dial to a recording program other than and move the / (card/ tape) switch to . 2. Press the DRIVE MODE button to switch between the drive modes. Pressing the button will cycle through the drive modes. The icon of the selected drive mode will appear on the screen. Continuous Shooting/High-Speed Continuous Shooting Press and hold the PHOTO button. A series of still images will be recorded as long as you hold the PHOTO button pressed down. Maximum number of continuous shots: Shots per second Maximum number of continuous shotsNormal speed High speed 3 images 5 images 60 images -These figures are approximate and vary depending on the recording conditions and subject. -Sufficient space on the memory card is required. Continuous shooting will stop when the card is full. Auto Exposure Bracketing Press the PHOTO button. Three still images in different exposures are recorded on the memory card. Make sure that there is sufficient space on the memory card. Using a Memory Card 117 Metering Mode Metering mode Use Evaluative Appropriate for standard shooting conditions, including backlit scenes. The camcorder divides images into several metering zones. It evaluates the position and brightness of the subject, background, direct light or backlight, and adjusts the exposure of the main subject accordingly. Center-weighted average Averages the light metered from the entire screen, giving more weight to the subject in the center. Spot AE Meters the area within the Spot AE frame. 1. Set the dial to M, , Tv or Av, and set the / (card/tape) switch to . 2. Press the button. • Pressing the button will cycle through the metering modes. The icon of the selected metering mode will appear on the screen. • If you selected Spot AE, the Spot AE frame appears in the center of the screen. Using an Optional Flash You can use E-TTL II-compatible Canon Speedlite flashes designed for use with Canon SLR cameras, including the 420EX/430EX/430EX II/550EX/580EX/580EX II models, to record natural still images under low light conditions. Refer also to the instruction manual of the Speedlite flash. The following procedures are explained using a Canon 580EX II Speedlite Flash. Connecting a Speedlite Flash When connecting a Canon Speedlite flash you cannot use the Off-Camera Shoe Cord designed for Canon EOS SLR cameras. Always turn off the camcorder when connecting or removing the flash. 1. Slip the flash’s mounting foot all the way into the camcorder’s hot shoe. 2. Slide the lock lever on the mounting foot to the right until it clicks in place. To remove the flash: Press and hold the lock-rele...
Questo manuale è adatto anche per i modelli :Videocamere - XH G1S (7.35 mb)